
RECENT POSTS
-
 June 20, 2023
 -
 May 29, 2023
 -
 May 16, 2023
 -
") May 9, 2023
May 9, 2023 -
 May 3, 2023

")

Simple Guide On How To Install Metal Roofing Over Plywood
For your home to have a classy, sophisticated, and sleek finish, a touch of metal roofing can do the magic. It is easy to maintain and really durable. It can last as long as 45 years and more. It has one of the best roofing materials that can upgrade your home.
The plywood is a perfect foundation that performs the basal and functional structure, holding the roof’s fasteners together. It also acts as important structural support.
A quality substructure will withstand snow, heavy rainfall, wind, and the weight of the roofing material itself, bypassing the weight of all these loads properly and keeping the roof structurally protected.
Modern roofs are usually produced with several layers, so if you notice rotted or sagging plywood roofs, it can be a problem for your home and should be repaired or replaced as soon as possible. The steps below involve how to install metal roofing over plywood.
Step One: Inspect And Prepare The Plywood Decking
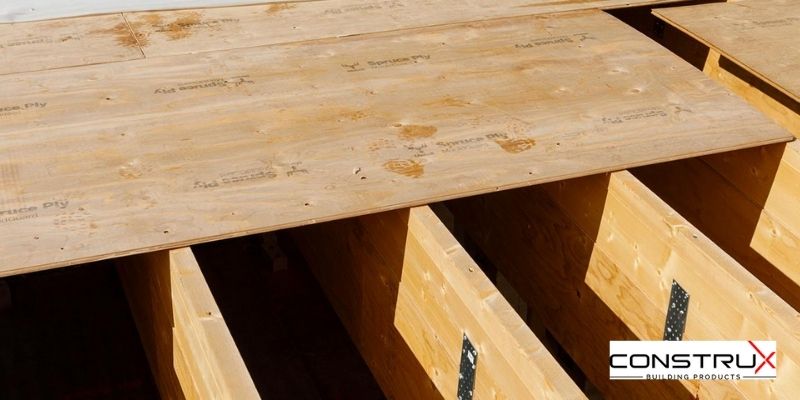
During a roof repair, if you still want to use old plywood underneath your new roof, the first thing you must do is inspect the existing plywood underneath it for signs of damages.
If you have observed any sign of warped pieces or rot, this means it must be replaced as soon as possible. The plywood replacing it must be thick up to about 15/3 inches. Installing a new roof over damaged plywood can be destructive over time.
Also, if during an inspection, you observe raised nails, you can use a hammer and put them down in place, so that they will not get in the way of the new metal panels. To have a clean and nice surface, use a sweeping aid to smoothen the plywood. Also, take away any unused pipes and vents.
Step Two: Apply Waterproof Underlayment And Slip Sheet
Since directly laying your roof panels onto the plywood is not a great idea, you should use a barrier to protect it from having contact with moisture and bad weather conditions such as wind, heavy rainfall, and snow.
Place the underlayment flat on all the extensive portions of your roof, let them lay on top of each other row by row and about two inches apart. Cut protruding felts like pipes and working vents with a roofing knife and lay the felt flat. To ensure its smoothness, drive-in roofing nails for holding the felt firmly in place.
You can use building paper as your slip sheet. The slip sheet can be laid on the surface of the felt. It prevents the felt from sticking to the metal panel and tearing it apart. You can use roofing nails to secure it in place.
Step Three: Here Is Where You Install Gutters And Flashing
First, measure the length of the roof at its edge before using the measurement to cut out the flashing material. Install the gutter and flashing along the edge of the roof, using roofing nails to secure it.
If you desire to install gutters in the valley areas of the roof, use snips to cut the gutters. The sizes must be measured accurately to fit the area, and secured firmly with a few roofing hardware.
Step Four: Install The Metal Roof Panel
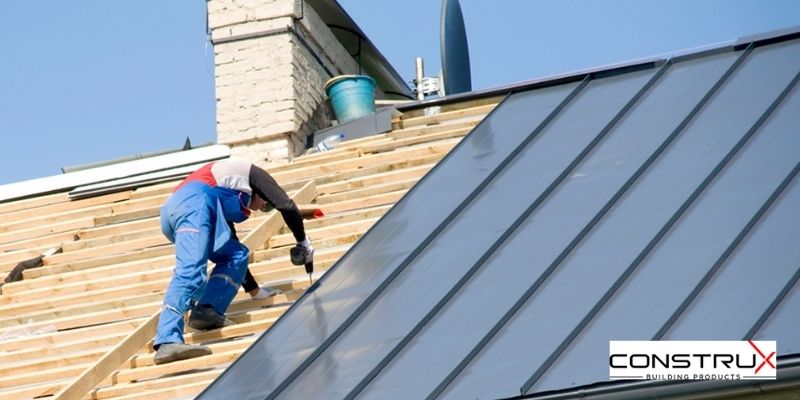
The moment you are ready to cover the metal panel above the plywood, you will have to increase your work around the roof. Work will begin from the bottom of the roof. Snap a small vertical line using a chalk box and take measurements from the roof’s edge.
Afterward, begin by laying the first panel into various placements beneath the sinistral area of the roof. Work up toward the horizontal surface of the roof and partly cover the roof’s edge by an inch. Secure the panel with a hardware roofing supply, keep spaces up to about 12 to 16 inches apart.
Step Five: Installing The Rest Of The First Panel Column
After the first panel has been installed, you have to move to the next panel and also install it. Work your way toward the top of the roof before returning to the bottom of the roof where you will be installing the next column of the panel.
Align the second panel, assembling it accurately in such a way that it is directly placed above the first panel. Allow their edges to overlap each other about 12 inches apart. Use metal screws to firmly secure the metal, in the same way, you secured the first panel.
Step Six: Finish Installing The Remaining Column of Panels
Begin the installation of the next metal roof panels. At this step, you can begin installation at the back, toward the end of the roof. Delicately position the next panel on top of the already installed panel.
Position the first sinistral rib of the new panel on top of the last right side part of the adjoining installed panel. Rerun this step for each panel until the whole roof is successfully covered.
Step Seven: Cross Checking and Finishing Touches
After you have covered the entire roof, you may want to apply the ridge and keep plastic pipe boot kits where you will be placing the vent pipe. Now that the process has been completed, your new metal roof will look stunning to behold.
Conclusion
If you want to install your metal roof all by yourself, following the steps above can e helpful in making it a reality. The entire idea is to have a sound structure that will give your home top-notch security.
When getting plywood for replacement, you must make sure the material is quality-made and can protect the roof above it. You should never neglect any sign of damage on your plywood, as they can cause serious harm over time.
For you to have a good-looking and sound structured metal roof, the plywood must be thick enough to help the roof withstand its weight, rain, snow, and wind. Always know that a good under-structure is a good support system and therefore must be taken seriously.
COMMENTS